How we pack eggs for safe shipping

Packing Eggs for Safe Shipping

Packing Eggs for Safe Shipping

You ship eggs???  How do you do that??  Do they not break during shipment?

Those are a few of the many questions we get asked on a regular basis.

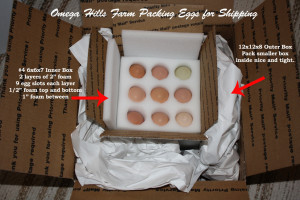
Trusting the postal service to treat our packages with care is a scary and somewhat foolish idea.  There are a number of dangers that any package faces during shipment.  However, those dangers pose a greater threat to our fragile shipments of eggs.   None of our customers want to be on the receiving end of a very expensive omelet.  So take a look at the picture to see how we package each shipment to protect the eggs from damage.


First we start off with foam that is specially made for shipping eggs.  Each layer of foam holds 9 eggs.  We stack 2 layers in a 6x6x7 box.  There are layers of foam on the top, bottom, and between the eggs.  The box is then sealed up and placed inside a larger 12x12x8 box.

The smaller box is then packed in tight to prevent it from moving around during shipment.  This provide the eggs with 4 layers of protection.  Two layers of cardboard, one layer of foam, and one layer of packing material.  On the outside of the box we label it “Live Animals” and “Fragile Handle With Care”.  We also mark the top so that the eggs will ride in the proper position.

While this has proven to be the safest method for shipping eggs, it does not guarantee  100% safe delivery.  If the box is run over by a forklift or thrown down a flight of stairs or even used as a soccer ball for bored warehouse workers the eggs will break.   And yes we have had a few shipments in the past that appeared to have that happen to them.  In those cases we filed a claim with the post office and had no troubles getting the claims approved.

So next time you are asked how people ship eggs, you can tell them exactly how we do it.
Homemade Chicken Brooder for less than $30

Many people who are raising chicks for the first time are looking for an easy and affordable way to house them.
This article will show you how you can make your own chick brooder for under $30.

Here is the materials list and links to buy them online or you can find them at your local walmart or lowes.

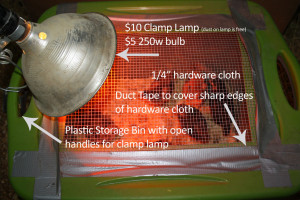
$10 Plastic storage box. Carry thru handle provides a perfect clamping spot for the heat lamp.
The link below to walmart.com is a listing for a set of 6.  That is the only way they sell them online.
Your local store will have them available one at a time.
http://www.walmart.com/ip/Sterilite-10-Gallon-40-Quart-Easy-Carry-Tote-Spicy-Lime-Set-of-6/22582944

$6.50 8 1/2″ Clamp Light
http://www.walmart.com/ip/Bayco-8.5-Clamp-Light/14003467

$5 Heat lamp Bulb
http://www.tractorsupply.com/en/store/westinghouse-lighting-250w-r40-heat-lamp-incandescent-light-bulb-red?cm_vc=-10005

$6 Hardware Cloth
http://www.walmart.com/ip/Mat-Mesh-Hardware-Cloth/20822625

Tools needed:
utility knife
duct tape (not listed in materials because you should have some already)
wire cutters

Cheap Homemade Brooder

Cheap Homemade Brooder


Step 1. Cutting the lid

To cut the lid you want to first score it. You score it by simply scratching the cut line and not cutting all the way through.
It is actually easier to get a straight cut by repeatedly scoring your cut lines rather than trying to cut all the way through in one pass of the knife.

Most lids have an indention or lowered area. This provides the lid more strength when stacking. Since we are not stacking the box, I will usually cut out most if not all of the lowered area.
Just be sure that your hardware cloth is larger than the hole you cut.

Step 2. Cut the hardware cloth.
Measure out the hole cut in the lid and using the wire cutters cut a piece of hardware cloth 2 inches bigger in each direction.
This will give you an inch overlap.


Step 3. Attaching the hardware cloth to the lid

Duct tape the hardware cloth to the lid on all 4 sides.  Note that once the heat lamp is on, the duct tape may wrinkle up.  You will just have to press it back down every now and then.
Alternatively you can use wire ties to attach the hardware cloth to the lid. To do this you will need to drill holes through the lid and then run the wire tie through the hardware cloth and lid and zip them.
This leaves the edges of the hardware cloth exposed which it can be sharp and pointy.  So we prefer the duct tape.  Using the zip ties and then duct taping the edges is the best method.


If you bought the storage box with the carry-thru handles you can simply clamp the heat lamp to the handle and point it toward the hardware cloth.
If not you will need to place the brooder close to something that you will be able to clamp the light on.  A chair or table leg work well.

For the bottom of the box, you will want to fill it with litter.  We prefer large flake pine shavings.
Not the small saw dust size as the chicks can eat it and not cedar as the oil can damage the chicks legs.
If you do not have shavings available then another option is to use fine soft hay.  Just be sure it it not pointy and rough.

For feeder and waterer you can buy them from your local feed store or you can simply use jar lids.  If using a jar lid for a  waterer you will want to put marbles or washed rocks in a jar lid to keep the chicks from falling down in the water and drowning.

It is truly that easy and inexpensive to build your own brooder.

Hatching day is always a good day.

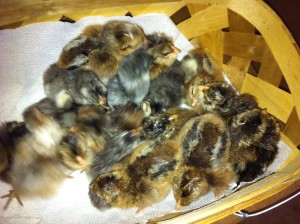
Today is hatching day.  Below is a picture of some of the chicks that are just a few hours old.IMG_0846

Sorry for the fuzzy picture I was trying to hurry and get them into the brooder to keep them warm.

There are several breeds of chickens in the basket.  Barthuhner, Isbar, Bielefelder, and Chocolate Wyandotte.

They can currently be see live on our brooder cam.


Follow Us on: